![Chromebook vs Laptop: Which One to Buy]()
Chromebook has emerged from its niche category and it’s no longer just for kids and students. OEMs are now making Chromebooks with powerful internals that would easily rival against the best laptops based on Windows and macOS. Further, Google recently announced Linux support and brought many UI improvements to make Chrome OS a desktop-class operating system. Keeping all the points in mind, it seems Chromebook is finally ready to face the competition. So in this article, we bring you a detailed analysis on the clash between Chromebook vs laptop. From performance to battery life and user interface, we have compared both Chromebook and laptop in a comprehensive manner. So without losing a moment, let’s find out who wins the battle of Chromebook vs laptop in 2020.
Chromebook vs Laptop: The Showdown
Since Chromebook is the unknown quantity in this comparison for most users, we have tried to explain its features in more detail. Also, we are using Windows as our main comparison tool, but most of these points remain valid even for other desktop operating systems. With that out of the way, let’s begin our showdown, shall we?
The Operating System
The prime difference between Chromebook and laptop lies in their operating system. To put it straight, Chromebook runs Chrome OS — a lightweight, Linux-based operating system developed by Google. And laptops mostly run Windows and macOS which are developed by Microsoft and Apple respectively. So how does Chrome OS fare against Windows and macOS in this battle of Chromebook vs laptop?
As I said, Chrome OS is a lightweight operating system and it’s very modular. In terms of storage size, it only takes up 4GB of space and the installation image is just 1GB. In contrast, Windows and macOS take up more than 15GB of disk space and the installation images are way above 4GB. Not to mention, Windows has more than 50 million lines of code whereas Chrome OS consists of less than 7 million lines of code.
![the operating system]()
All these numbers indicate that Chrome OS has a very small footprint on the hardware resources and that reflects in its performance (more on this later). For now, we can infer that Chromebooks have very little resource overhead in comparison to laptops, mostly because of its lightweight operating system. However, there is a reason as to why Windows is so heavy and resource-intensive. If you want to play graphics-heavy games, do 3D modeling or create large document projects then Windows stands as a reliable platform. I have discussed the capabilities of both the operating systems in detail ahead so read on and you will get a better idea about both the ecosystems.
Chromebook vs Laptop: Hardware Need
Since Chromebook does not run on a demanding operating system, it does not need top-of-the-line hardware. You can actually run Chrome OS on any low-powered chipset without worrying about the performance. For example, you can comfortably use Chrome OS on Celeron or Pentium processors which, by the way, are not counted among the best chipsets, and can get fairly decent performance. Apart from that, Chrome OS is compatible with both Intel and ARM processors out-of-the-box. So in that way, Chromebooks are less resource-intensive and is also future-proof.
![Chromebook vs Laptop: Hardware Need]()
Coming to laptops that run Windows and macOS, you need a capable processor to get the operating system running. As the OS is demanding, you need at least an Intel i3 to get a decent performance out of the laptop. This translates to more cost, but you can perform a multitude of tasks that Chrome OS inherently lacks (like video editing and gaming). Also, with a powerful processor in tow, you can run many desktop-class applications on Windows laptops without any worry. So to put it straight, for general tasks like browsing the web and watching videos, you don’t need a powerful processor, hence a Chromebook would suffice. However, on laptops, you will need a capable chipset to get started, but on the positive side, you will also have more horsepower by your side for resource-heavy applications.
Performance
After understanding the difference between Chromebook and laptop in terms of the OS and hardware, we can now move to the performance front and find out who wins the battle between Chromebook vs laptop. Let me put it straight, Chromebooks perform far better than traditional laptops as far as general tasks are concerned. To give you a personal example, I use an i5-powered Chromebook and a similar-specced i5-powered Windows laptop and the performance difference is significant. After turning on the Chromebook, I am able to sign in within seconds whereas the Windows laptop takes considerable time to boot. Further, after sign-in, Chromebook is ready to perform whereas the Windows laptop takes some more time to start its services.
![performance chromebook vs laptop]()
The difference in performance is understandable because Windows has been in existence for years and has added libraries for games, developer tools, recovery tools, drivers, network utilities, support for third-party applications and innumerable other things. On the other hand, Chromebook does not have the burden of supporting so many things because it does not have support for native apps, games, special software or countless third-party utilities. We can say that Windows laptops are although slow, but complete machines and can be used by both professionals and general consumers. In contrast, Chromebooks have limited features for professionals, but a great machine for general users. When it comes to tasks like web browsing, photo editing, playing music, writing documents, drawing — which most of us do — then Chromebook outsmarts laptop by a huge margin.
![laptop vs chromebook]()
User Interface and User Experience
Chromebook was first conceptualized in 2009 so the underlying operating system is quite modern in comparison to Windows laptops. You have a centered taskbar, an app launcher similar to what we have on smartphones, a quick setting panel and more. Basically, Chrome OS seems inspired by the smartphone interface, particularly by the Android design language. There is also a tablet mode, support for touchpad gestures, and a number of keyboard shortcuts to make UI navigation a breeze for you. Due to the mobile-driven UI, the operating system feels very snappy and responsive to use.
![user interface]()
Apart from that, the positive result of following the smartphone design language is that you get a granular permission system similar to Android. It basically means that unlike Windows, apps & websites on Chromebook need your explicit permission to access local files, microphone, webcam, notifications, etc. However, the negative outcome of this approach is that some UI elements like menus, buttons, and controls have smaller target areas — as if they are designed to tap and not to click — which gives a feeling of an immature desktop OS. Similarly, the file manager is not as feature-packed as Windows laptops and many would be disappointed to find that you can’t operate anything on the desktop.
![User Interface and User Experience]()
Having said that, the reason Chromebooks feel so responsive and snappy maybe because of this minimal approach. Sure, Windows laptops have tons of file explorer and UI customization features, but that is exactly why it feels sluggish — features packed to the brim, but of little use. So to conclude, in comparison to laptops, Chromebook falls short on some UI and file management features. However, the user experience remains solid because of the mobile-driven UI, gestures, tablet mode, notification, and permission controls.
Chromebook vs Laptop: App Support
If you are confused, whether to choose Chromebook or laptop then this section would help you pick one. Chromebooks primarily support web and Android apps. By web apps I mean, websites that work and behave more like an app with offline support. They are also called PWA (Progressive Web Apps). For example, Twitter, Pixlr, Spotify, Zoom, etc. — all offer web apps and they work absolutely great, often better than native apps found on Windows laptops. In fact, companies are increasingly moving towards web apps including Windows which has started hosting web apps on Microsoft Store.
![Chromebook vs Laptop: App Support]()
In addition to that, you also have access to Android apps on Chromebook. And the best part is that Android apps are optimized to work in full-screen mode with mouse and keyboard support. You have access to many quality Android apps like Microsoft Word and drawing apps straight from the Play Store. However, keep in mind, some Android apps don’t offer the full set of desktop features on Chromebook (like Microsoft Word) as you would get on a Windows laptop. Apart from that, Google recently introduced Linux apps on Chromebooks. So in a nutshell, you can run apps from three ecosystems: Web, Android, and Linux. I use web apps for most of my work, but there is GIMP (Linux app) for photo editing and ProtonVPN (Android app) for VPN. And when I want to run a Windows program on Chromebook, I use the Linux app called Wine which works pretty well.
![Chromebook vs Laptop: App Support]()
Coming to Windows laptops, there is not much to write home about app support. Since the platform has been in existence for the last four decades, laptops enjoy incredible support from developers all around the world. From basic photo-editing app to professional-grade software, laptops have wide support and you can get dedicated native apps and utilities for almost everything. Simply put, in terms of the diverse range of app support, laptops are far ahead than Chromebooks. Another big win for laptops is the app features. While the same apps may exist on both platforms, the apps on Windows device offer more features. Take Microsoft Word as an example. Since you can only use a mobile app or web app version of Word on Chromebooks, you are using a watered-down version of the app.
Having said that, Chromebooks have also improved a lot and there is everything available for a general user. Not to mention, with the Linux support in tow, Chromebooks have become a solid machine for developers too.
Gaming
In the gaming war between Chromebook vs laptop, there is simply no competition. Chromebooks are not the best machines and you should look at laptops for playing games, preferably a Windows laptop. There are some good Android games available on Chromebook and they run quite well, but again, you won’t find AAA titles and other popular games. Apart from that, with Linux support, you can install Steam on your Chromebook and play FPS games like CS: GO, but you will need higher storage and powerful processor. I did try installing a few games from Steam, but let’s say, it was not the best experience. The only silver-lining on Chromebook is cloud gaming service like Google Stadia, but so far, it hasn’t shown the promise that we expected. All in all, if you want the best gaming experience then opt for a Windows laptop over Chromebook.
![gaming]()
Offline Support
Contrary to popular misconception, you can use Chromebooks even when you are offline. You can log in to your Chromebook, play downloaded songs and movies, use offline apps, continue writing documents and more. For instance, to use Pixlr (a photo editing website) while being offline, all you have to do is create a PWA of the website. Click on the “Install” button at the address bar and an app will be created. Now, you can use it even when you are offline. In case, a website does not have offline support, you can download its Android counterpart. For example, Office 365 does not have a PWA so you can download Microsoft Word or Excel from the Play Store which comes with offline support. Similarly, you can download Netflix shows and movies for offline viewing from its Android app on Chromebook. So similar to laptops, Chromebooks also work while being completely offline and there is nothing to worry about.
![offline support]()
Voice Assistant
Many companies tried their hands on voice assistants, but Google Assistant still remains the reigning champion. And the best part is that Chromebooks now ship with Google Assistant support having a dedicated Assistant button on the keyboard. With Google Assistant on Chromebooks, you can ask questions, create a timer, play songs, set a reminder and everything will be synced to your Android smartphone. Similarly, all calendar notifications from your smartphone will be notified on your Chromebook. How awesome is that? In contrast, Cortana on Windows laptop is not as advanced and most of the time, it fails to recognize your voice instructions. I would say, in the Chromebook vs laptop battle, this time Chromebook records a thumping win.
![voice assistant]()
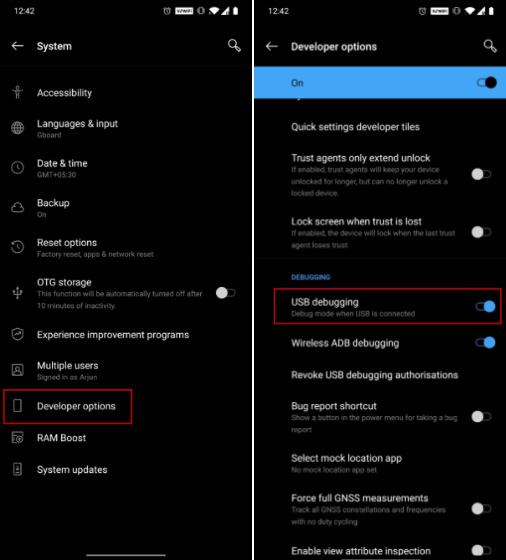
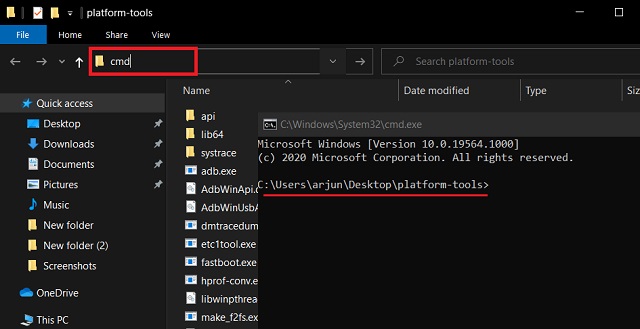
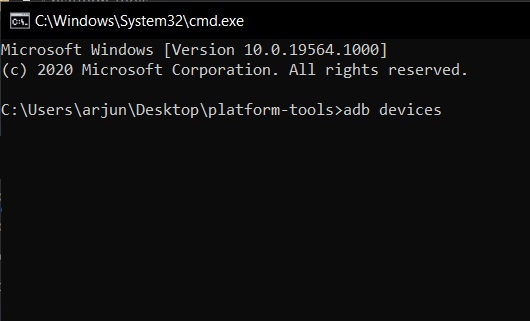
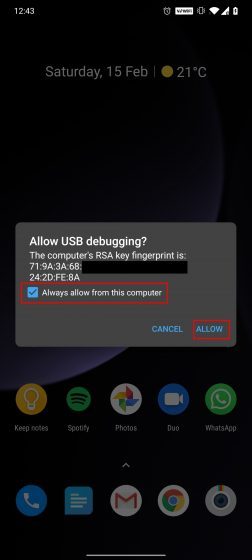
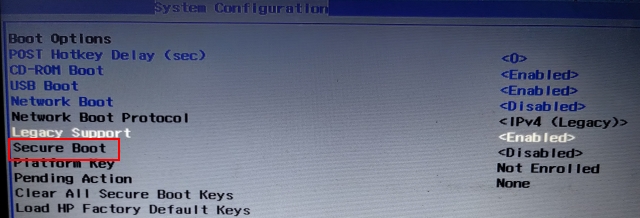
Security
In terms of security, Chromebooks are considered one of the most secure devices and it’s party because of its update system. Google tightly controls the update mechanism on Chromebooks, unlike Windows laptops where the update system is plain horrible. Since Chromebooks are made for general users, Google has devised a seamless way to update the operating system. It works in such a way that users won’t even realize that their machine got updated. With something called a Seamless Update Mechanism, the update gets downloaded in the background and installed in a secondary partition. Now when you restart your Chromebook, the boot slot is switched and you get updated within seconds. So if you want a secure and no-frills machine, especially for general users that updates in a jiffy then I would recommend Chromebook over laptops any day.
![update and security]()
Battery Life
As I said above, Chromebook is powered by a lightweight OS so there is no overhead, hence no strain put on the crucial resources. As a result, it translates to stellar battery life on Chromebook. I use Chromebook and Windows laptop side by side, and the former lasts me more than 10 hours of continuous usage on a single charge whereas the latter fizzles out in just 4 hours. I can say one thing for sure. If battery life is essential to you then pick a Chromebook over a laptop blindfolded. In terms of battery life, it’s even better than laptops running macOS as well.
![battery life]()
Pricing
The final point that we need to discuss is the pricing. Since Chromebooks can run on older hardware, you can find quite capable Chromebooks starting at around $300. You can go even cheaper if you want to, but it’s at the $300 mark that you get the good stuff. On the other hand, buying a good Windows machine will cost you upwards of $500. The entry point for a macOS notebook is $999, so there’s no point in discussing it in the mix. The bottom line is that if you have budget constraints, you will be better off by buying a capable Chromebook than a trash-laptop for the same price.
The Verdict: Chromebook vs Laptop
To find out, whether Chromebook or laptop is suitable for you then you should begin with the objective first. What do you want to do on a computer? If you want to browse the web, write articles, create presentations, watch videos, edit photos, draw a sketch then Chromebook is a perfect pick and way better than traditional laptops. Performance, battery life, and security are top-notch on Chromebooks.
However, if you want a complete solution where you can do everything including gaming, video editing, and can access professional software from the likes of Adobe and Autodesk, then laptops would be a suitable pick for you. But bear in mind, you would get everything on a laptop, but at the expense of excellent performance, stellar battery life and fast update.
Anyway, that is all from us. If you found the article helpful or have any questions for us then do comment down below and let us know. And if you have made up your mind to go ahead with a Chromebook then head over to our list of best Chromebooks to buy.